

How to make square legs with straight grain face.

Start with attractive stock
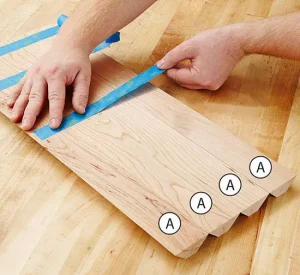
When choosing boards for the leg faces (A) [Drawing below], look for clear material of similar color. This makes each leg look like one piece of solid wood. If you find a straight-grained board more than twice as wide as one face, cut adjacent faces from it, and wrap the grain pattern around the corner.
After choosing your boards, rip them 1⁄4 ” over finished width, then cut them to length. Be sure to label each piece so you can identify parts for each leg and assemble them as intended.

Build a sled for accuracy
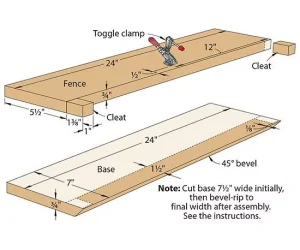
The sled shown below carries the leg stock through the tablesaw blade safely while ripping each piece to identical width. Build it from dead-flat plywood or MDF. Bevel-rip the base, and then attach the fence 11⁄2 ” from the beveled edge. Use a leg piece to help position the cleats at each end.
Position the toggle clamp so it applies pressure 3⁄4 ” from the edge of the fence. This prevents the leg face from tipping when beveling the second edge.
Next, test (and tweak) the tilt
Before cutting into your good stock, adjust your tablesaw bevel angle to exactly 45° by making bevel-rips in four identical-width pieces. Assemble the test pieces, and, if all four corners close tightly, you’re ready to begin. Lock the blade-tilt mechanism on your saw to prevent the blade from shifting.
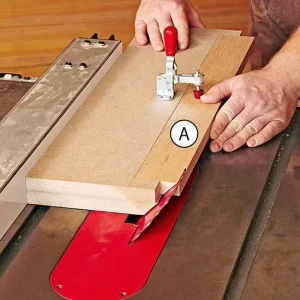
Set up the sled; then rip
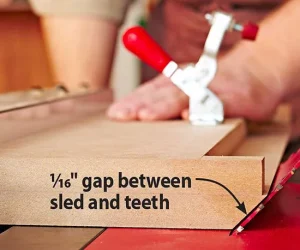
Position the tablesaw rip fence and sled as shown in photo at below. Bevel-rip one edge of each leg face at this setting as shown in photo second, below. Then lightly nudge the rip fence so the edge of the sled just brushes the blade’s teeth, and bevel-rip the opposite edge of each piece.
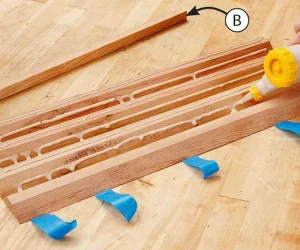
Tape, glue and roll
Dry-fit four leg faces and cut a core (B) slightly longer than the leg so it slides easily, but not loosely, into the center of each leg.
Quick Tip! Sanding or planing 1⁄32 ” chamfers on the edges of the core allows the leg faces to fit tightly at the inside corners. Then glue up each leg as shown in photos below.

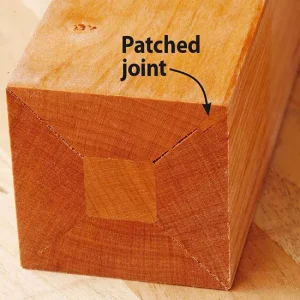
Oops, a gap! Now what?
Even with careful planning, cutting, and assembly, you may end up with a gap in a joint. Don’t panic; the fix is simple. First, bevel-rip two straight 11⁄2 x 3 x 24″ scraps at 45°. Use the rip fence and a leg to position them on either side of the blade (but not touching it), so the scraps support the leg, below. (You may need to trim back the pointed edges of the bevels on the scraps.) Secure the scraps with double-faced tape, then cut a 1⁄4 “-deep kerf through the open joint on the leg.
Remove the scraps, tilt the blade to 3°, and rip a 1⁄8 “-wide filler strip from a scrap of wood the same species and color as the leg. Glue the filler strip in place, allowing it to stand proud of the leg faces. (The slight bevel wedges the filler tightly in the kerf.)
After the glue dries, trim the filler and sand it flush for a nearly invisible patch, below. When cutting the mortise joints in the leg, place the patched corner to the back and inside to hide it further.
Free Woodworking Plans